Ten Easy Steps Towards Biofloc Production of Shrimp or Tilapia
| Tue, 30 Jul 2019 - 12:02
Based on interviews with some of the earliest developers and adopters of biofloc, including Djames Lim from Singapore (CEO of the Lim Shrimp Organization), Khoo Eng Wah from Malaysia (managing director of Sepang Today Aquaculture Centre), Barkah Tri Basuki from Indonesia (Founder of Banglele Indonesia) and Dr Nyan Taw from Myanmar (senior shrimp farming consultant), The Fish Site presents a practical 10-step guide to help you incorporate biofloc principles in your shrimp or tilapia operations.
The costliest factors in aquaculture are high-quality feeds, filtration systems and the investment needed for ample space to grow target species. With continuously rising production costs, farmers and researchers are looking for alternative ways to produce more seafood while utilising fewer resources.
Originally conceived as a natural way to clean water, biofloc systems are becoming increasingly popular as a low-cost means of cleaning the culture water of fish and shrimp farms while simultaneously providing an additional source of feed. Best of all, implementing biofloc principles requires little investment – as only sunlight, a carbohydrate source and plenty of aeration are needed.
Biofloc systems bank on photosynthesis to convert uneaten feeds, faeces and excess nutrients into food. While breaking down toxic ammonia and nitrates, both primary-producing autotrophic and heterotrophic bacteria multiply to attract an ever-growing host of organisms – including diatoms, fungi, algae, protozoans and various types of plankton. Loosely bound by bacterial mucous, most of these floating clumps or “flocs” are microscopic. Larger aggregations can be seen by the human eye, resembling brown or green sludge. Though not too appealing for humans, this is a scrumptious smorgasbord for fish and shrimp.
By recycling proteins, biofloc systems overcome concerns associated with high animal-stocking densities and low filtration capacity – like decreased water quality and increased risk of disease outbreaks. In traditional farming systems, only about 25 percent of the protein content of feeds are actually utilised by farmed species. By converting ammonium into microbial proteins that can be consumed by filter feeders, biofloc systems are able to double this figure, saving farmers big money. Biofloc systems reduce the spread and effectiveness of pathogens while simultaneously improving fish health through better water quality and bolstered feed availability. As such, biofloc systems can give us a natural way of producing more seafood sustainably, while concurrently improving farm profitability.
More of Asia’s top shrimp-industry players are shifting to biofloc. As Djames Lim, CEO of one of the largest shrimp farming operations in the region, explains: “Without biofloc our company wouldn’t be able to achieve its ambitious growth rates without compromising environmental integrity and animal-welfare principles. This system is a win-win situation for all stakeholders.”
It’s important to understand that biofloc systems and their underlying principles are relatively new and complicated aquaculture concepts. There are still many unknowns and much remains to be discovered. We encourage readers to conduct further research and to share their experiences to maximise everyone’s chances of success. And don’t forget to check out the training reference section at the end of the article for some very useful links.
Step 1: Tank or pond set-up
Though it’s possible to convert traditional fish ponds without any liner into a biofloc system, it’s a challenging task. Microbes, minerals and heavy metals naturally based in the soil easily influence the parameters of the pond water and can affect the natural processes underlying the biofloc system.
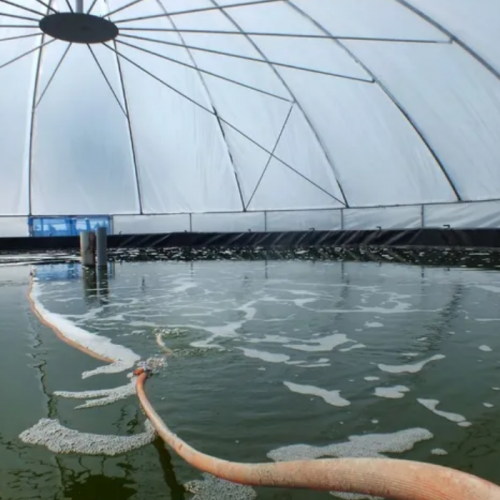
As Khoo Eng Wah, managing director of the Sepang Today Aquaculture Centre (STAC) in Malaysia explains: “For those new to biofloc, it’s best to start with lined ponds, concrete ponds or indoor tanks wherein soil has no influence over water parameters or biofloc processes.” In most tropical countries, indoor systems have a big advantage. “As we experience heavy rainfall, alkalinity and pH are easily affected in outdoor systems. Covered ponds are good options.”

Indoor tanks or raceways can be used as well, but without the presence of natural sunlight, algae won’t grow sufficiently or won’t grow at all – creating a biofloc system based solely on bacteria. These so-called “brown biofloc systems“ are brown in colour and are discussed in more depth later (Step 7).
If you use large ponds you should instal bottom drains to occasionally remove excess sludge. This is especially important when adding carbohydrates on a regular basis, which adds considerably more sludge to the pond (Step 4). A second option is to use biofloc reactors to accelerate the conversion of pond sludge to bioflocs.
Step 2: Aeration
After you have selected the right pond or tank set-up, it’s time to work on the aeration system. All biofloc systems require constant motion to maintain both high oxygen levels and to keep solids from settling. Areas without movement will rapidly lose oxygen and turn into anaerobic zones which release large amounts of ammonia and methane.
To prevent this, every pond, tank or raceway system needs a well-planned layout of aerators. Ponds typically use paddlewheel aerators. Biofloc systems require up to 6mg of oxygen per litre per hour and it is recommended to start with at least 30 horsepower of aerators per hectare. But, depending on the intensity and productivity of the system, this number can reach as high as 200 horsepower per hectare (See table 1 from the Southern Regional Aquaculture Center further on).
Paddlewheel aerators should be installed strategically so that a current is created in the pond. You also need to regularly move some of the aerators to ensure solid particles won’t settle in areas with little or no current.

Step 3: Pre-seeding beneficial microbes
To accelerate the development of your biofloc system and stabilise your pond faster, it is advisable to pre-seed the culture water. This can be done by adding a number of commercial or homemade recipes to the culture water. INVE and VINNBIO are two of the better-known companies that provide starter cultures for various probiotic microbes, but there are many locally produced brands available across Asia as well (just check out online forums or Alibaba). A simple homemade recipe to quickly produce probiotic and prebiotic microbes uses wheat pollard and Red Cap 48 (a local product from South-East Asia) mixed in a closed drum and left to ferment for 48 hours, after which the contents can be added to the pond.
Step 4: Species selection and stocking densities
Though most species would benefit from the improved water quality of biofloc systems, you want to select species that best benefit from the extra proteins generated, by feeding and digesting the bioflocs themselves. These species are wholly or partially filter feeders. Both shrimp and tilapia are excellent candidates, as they gobble up bioflocs, thereby dramatically improving the feeding efficiency and FCR of your farming operation.
At STAC in Malaysia, even non-filter feeders like jade perch and different groupers have been farmed in indoor biofloc systems, with very positive results. It is however important to avoid species which dislike murky waters with a high solid content, like some catfish and barbs. These species simply won’t perform as well.
Thanks to the strong aeration and self-filtering capacity of culture water, high stocking densities can be considered and it is common to stock shrimp at densities of 150 to 250 post-larvae per square metre. A safe stocking density for tilapia would be 200 to 300 fry per cubic metre. Many farmers try to use higher stocking densities but this significantly increases the risk of disease, compromising both the health and welfare of the animals.
Step 5: Balancing carbon source input
To prevent ammonia peaks (mostly originating from the nitrogen in feeds) at the start of the farming cycle, we recommend jump-starting the growth and development of biofloc in your pond or raceway system by ensuring the sufficient availability of carbohydrates. The carbon in these carbohydrates enables heterotrophic bacteria to multiply and synthesise ammonia, thus maintaining water quality.

We advise that you select only carbon sources and feed mixtures with a carbon-to-nitrogen (C/N) ratio above 10 as this favours the growth of these heterotrophic bacteria. Since most fish and shrimp feeds have a C/N ratio of 9:1 or 10:1, additional inputs are needed to raise this ratio to between 12:1 and 15:1. Any material that contains simple sugars and breaks down quickly can be used, such as molasses, cassava, hay, sugarcane or starch. Another solution is to reduce the protein content of the used feeds.
To prevent ammonia peaks at later stages of the production process, this step should be repeated, especially when using high stocking densities in combination with large amounts of artificial feeds.
Controlling this is one of the hardest steps for successfully implementing biofloc principles.
Step 6: Biofloc growth
With plenty of aeration, natural light (in most systems) and a readily available source of carbon, your biofloc numbers should start to multiply quickly. Depending on a variety of factors, including water temperature, available nutrients and sunlight, plus the number of seeded bioflocs at the start of the operation, the number of flocs will increase from close to zero to about four to five units per millilitre within a few weeks. Eventually an incredible density of up to 10 billion bacteria per cubic centimetre can be expected with, as Nyan Taw explains, “An incredible diversity of over 2,000 species,” all working hard to minimise the ammonia content in the water column and maintain good water quality.
Monitoring the growth of these flocs can be done by using a cone-shaped beaker to collect several water samples at a depth of 15cm to 25cm, preferably in the late morning. The solid particles should be left to settle for 20 minutes. They will stick to the sides of the cone-shaped beaker, making it easy to count them. For larger operations, the Mil Kin bacterial counter is a handy tool as well.
Step 7: Monitoring and control of biofloc development
From this point on, water samples must be regularly taken to monitor the pond water and determine the activity of the two biofloc types plus their respective densities. In simple terms, outdoor bioflocs consist of green algae and brown bacteria: the algae mainly utilise sunlight for their growth, while the bacteria mostly consume leftover feeds, their byproducts and associated wastes.
Since algae initially tend to multiply faster, this means that a pond looks green at first, turning brown over the following weeks as bacterial colonies start to dominate. With the stock growing and feeding volumes increasing, a tipping point will be reached wherein the water will remain brown. As Nyan Taw explains: “This brown colour is more quickly reached with tilapia as they are fed with more feeds, while it takes a bit longer with shrimp.” This colour shift is well illustrated in the colour index of Figure 4.

Step 8: Monitoring and control of water parameters and associated farm infrastructure
Once the biofloc system has turned brown, aeration must be significantly increased to sustain the high respiration rate. As shown in Figure 4, respiration rates at this stage can reach 6mg per litre per hour, requiring up to six times more energy per hectare compared with the start of operations.
Any power failure at this stage can quickly result in total crop failure due to a lack of oxygen and because in a low-oxygen environment many heterotrophic bacteria actually start producing ammonia. It is vital for the aeration system to stay functional at all times.
This means good maintenance and monitoring of the aerators themselves, plus the power system that provides the energy to run this system. As the power grid in many Asian countries is not too reliable, especially in the rural areas where many farming operations are based, it is advisable for farmers to invest in off-grid solutions. Several manufacturers of paddlewheel aerators offer solar-powered versions. These are however more costly and not always that powerful. A large diesel generator, including a second back-up generator set, might be the best option for most large-farm operations.
Regular monitoring of water-quality parameters, especially dissolved oxygen and ammonia levels, will give you a good idea if the system is working well, or if aeration needs to be increased further.
Step 9: Monitoring and control of farm stock
Besides maintaining water quality at lower cost and without water exchange, the second goal of a biofloc system is to improve growth rates and feeding efficiencies, thereby improving the profitability and sustainability of farming operations.
To check how the farm is doing, regular monitoring of the performance of the farm stock, calculating and recording growth rates, overall appearance, FCR and stock survival is required. It has been estimated that for every unit of growth in your stock from feed, an additional 0.25 to 0.5 units of growth can come from the biofloc in your system. You should thus notice a big jump when comparing current farm records with your previous, traditional non-biofloc farm operations.
Step 10: Harvest and clean-up
For shrimp, a harvest of 20 to 25 tonnes per hectare can be safely expected. If all steps have been followed, a farmer can expect increased growth rates and survival, thus reducing overhead costs and improving profitability.
Often forgotten and underestimated, proper cleaning and preparation of the pond set-up or raceway is vital after harvest time. Although it might seem appealing to reuse the culture water since it took intensive effort to build up the populations of microorganisms, this is not advisable. Pathogens might have built up the culture and can pose a serious biosecurity risk. Research has also indicated that over time, heavy metals can build up in the culture water, which can accumulate in your stock, making it unsuitable for human consumption. We highly recommend cleaning up well before starting your next profitable batch.
Source : The Fish Site


